Replacing old fixtures requires careful planning and safe execution. Start by assessing space, wiring, and fixture dimensions, then gather tools and a prep checklist. Choose fixtures that fit function and style while matching electrical compatibility. The swap should follow a methodical process: power off, remove old units, install per manufacturers’ instructions, seal connections, and test performance. Document changes for future maintenance, ensure alignment and safety, and consider color temperature and durability to finish with a polished look that invites the next step.
What You Need to Know Before You Start
Before starting a fixture replacement, gather the necessary tools, materials, and safety steps to prevent delays or hazards. This overview guides prudent preparation, emphasizing planning budget and measuring space.
Assess load requirements, wiring compatibility, and fixture dimensions.
Create a concise checklist to avoid surprises.
Documentation of measurements and costs supports informed decisions, timely procurement, and unobstructed progress throughout the replacement process.
Choosing Fixtures That Match Your Space
When selecting fixtures, the focus is on how well each option fits the space, function, and existing wiring. A practical approach compares lighting layout implications, ensuring compatibility with ceiling heights and wall scales. Consider water pressure impacts for faucets and showers. Choose fixtures that balance aesthetics with efficiency, avoiding clutter while preserving operability, safety, and future adaptability.
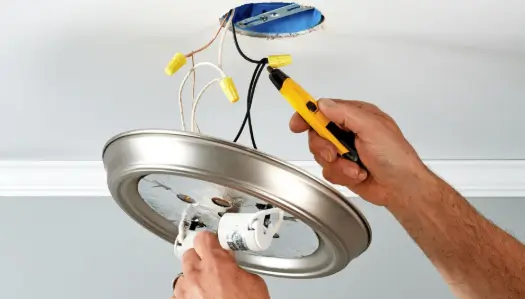
Safe, Step-by-Step Swap for Lights, Faucets, and Hardware
Safely swapping lights, faucets, and hardware follows a clear, methodical route that minimizes risk and ensures proper function. The process emphasizes safety, alignment, and verification, step by step.
Install new fixtures, seal connections, and test performance.
Consider brightness consistency during lighting swaps and water pressure modulation when replacing faucets.
Document changes for future maintenance, and always follow manufacturer instructions.
See also: The Rise of Decentralized Applications (DApps)
Quick Troubleshooting and Finishing Touches for a Polished Look
Quick troubleshooting and finishing touches ensure a polished look without rework. The article guides the reader to verify alignment, caulk neat edges, and test functions before final concealment. It stresses trend vs budget balance, recommending durable hardware and simple updates.
Color temperature choices shape ambiance, with practical notes on consistency across rooms and avoiding mismatched tones that undermine the cohesive result.
Conclusion
A careful plan meets careful hands. The old glow fades as the new fixtures snap into place, precise and calm. Juxtaposed with the hurried rush of wiring fear and improvisation, the process reveals a steadier rhythm: measure, compare, seal, test. In practical motion, aesthetics and function align, costs and durability balance. The space breathes a cleaner light, yet remain mindful of safety. Completed, the room feels refreshed, enduring, and thoughtfully prepared for the next maintenance touch.